Gradle 比 Maven 好为什么用的人少?
1、Maven
- Maven是专门用于管理和构建Java项目的工具,它的主要功能有:
- 提供了一套标准化的项目结构
- 提供了一套标准化的构建流程(编译,测试,打包,发布……)
- 提供了一套依赖管理机制
- 标准化的项目结构:
- 项目结构我们都知道,每一个开发工具(IDE)都有自己不同的项目结构,它们互相之间不通用。我再eclipse中创建的目录,无法在idea中进行使用,这就造成了很大的不方便,如下图:前两个是以后开发经常使用的开发工具。
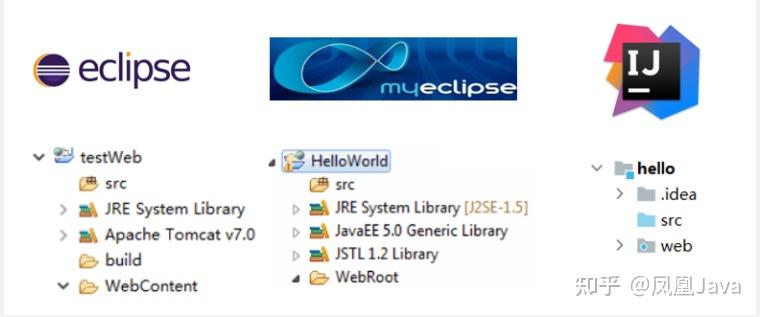
- 而Maven提供了一套标准化的项目结构,所有的IDE使用Maven构建的项目完全一样,所以IDE创建的Maven项目可以通用。如下图右边就是Maven构建的项目结构。

- 标准化的构建流程:

如上图所示我们开发了一套系统,代码需要进行编译、测试、打包、发布,这些操作如果需要反复进行就显得特别麻烦,而Maven提供了一套简单的命令来完成项目构建。
- 依赖管理:
- 依赖管理其实就是管理你项目所依赖的第三方资源(jar包、插件)。如之前我们项目中需要使用JDBC和Druid的话,就需要去网上下载对应的依赖包(当前之前是老师已经下载好提供给大家了),复制到项目中,还要将jar包加入工作环境这一系列的操作。
- 如下图所示

- 而Maven使用标准的 ==坐标== 配置来管理各种依赖,只需要简单的配置就可以完成依赖管理。

如上图右边所示就是mysql驱动包的坐标,在项目中只需要写这段配置,其他都不需要我们担心,Maven都帮我们进行操作了。市面上有很多构建工具,而Maven依旧还是主流构建工具,如下图是常用构建工具的使用占比
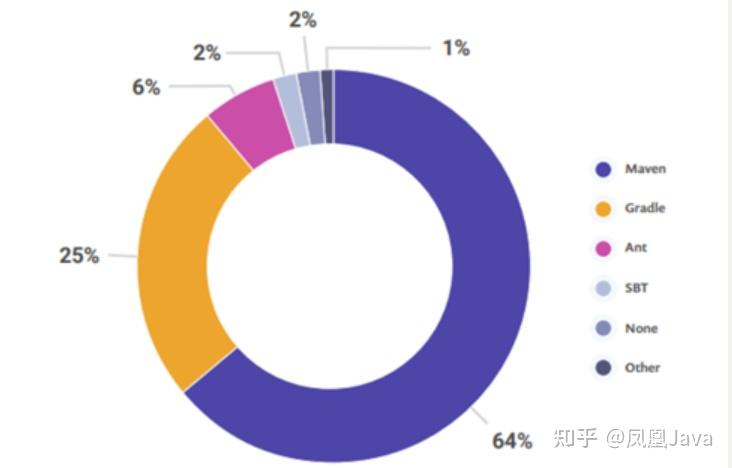
1.1 Maven简介
Apache Maven 是一个项目管理和构建==工具==,它基于项目对象模型(POM)的概念,通过一小段描述信息来管理项目的构建、报告和文档。官网 :http://maven.apache.org/
- 通过上面的描述大家只需要知道Maven是一个工具即可。Apache 是一个开源组织,将来我们会学习很多Apache提供的项目。
1.1.1 Maven模型
- 项目对象模型 (Project Object Model)
- 依赖管理模型(Dependency)
- 插件(Plugin)
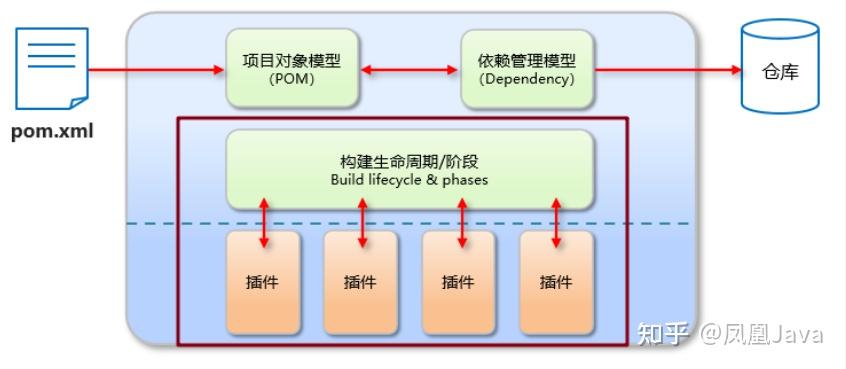
- 如上图所示就是Maven的模型,而我们先看紫色框框起来的部分,他就是用来完成
标准化构建流程。如我们需要编译,Maven提供了一个编译插件供我们使用,我们需要打包,Maven就提供了一个打包插件提供我们使用等。
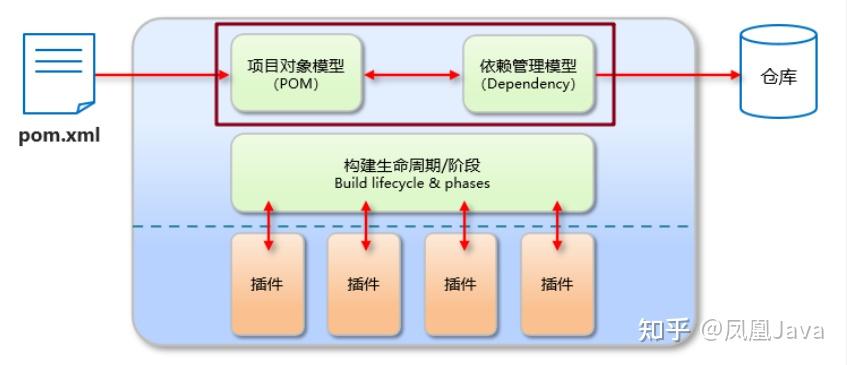
- 上图中紫色框起来的部分,项目对象模型就是将我们自己抽象成一个对象模型,有自己专属的坐标,如下图所示是一个Maven项目:

- 依赖管理模型则是使用坐标来描述当前项目依赖哪儿些第三方jar包,如下图所示
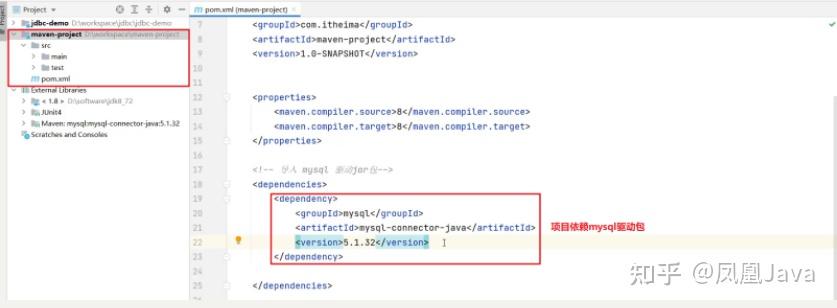
- 上述Maven模型图中还有一部分是仓库。如何理解仓库呢?
1.1.2 Maven仓库
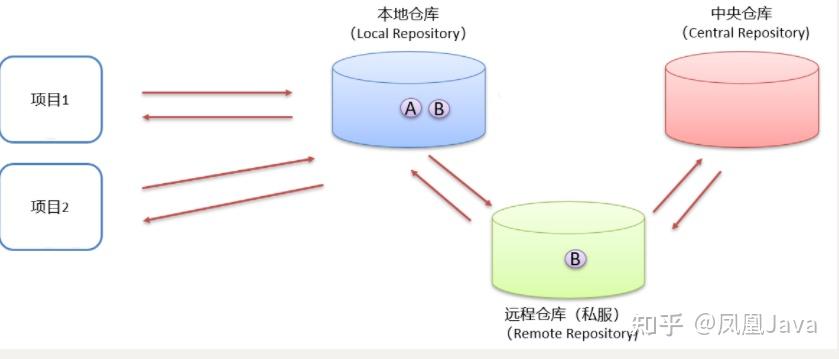
- 大家想想这样的场景,我们创建Maven项目,在项目中使用坐标来指定项目的依赖,那么依赖的jar包到底存储在什么地方呢?其实依赖jar包是存储在我们的本地仓库中。而项目运行时从本地仓库中拿需要的依赖jar包。
仓库分类:
- 本地仓库:自己计算机上的一个目录
- 中央仓库:由Maven团队维护的全球唯一的仓库
- 地址: https://repo1.maven.org/maven2/
- 远程仓库(私服):一般由公司团队搭建的私有仓库
- 今天我们只学习远程仓库的使用,并不会搭建。
- 当项目中使用坐标引入对应依赖jar包后,首先会查找本地仓库中是否有对应的jar包:
- 如果有,则在项目直接引用;
- 如果没有,则去中央仓库中下载对应的jar包到本地仓库。

- 如果还可以搭建远程仓库,将来jar包的查找顺序则变为:
本地仓库 --> 远程仓库--> 中央仓库
1.2 Maven安装配置
- 解压 apache-maven-3.6.1.zip 既安装完成

建议解压缩到没有中文、特殊字符的路径下。如课程中解压缩到 D:\software 下。- 解压缩后的目录结构如下:
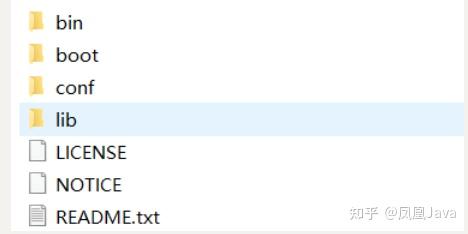
- bin目录 : 存放的是可执行命令。mvn 命令重点关注。
- conf目录 :存放Maven的配置文件。
settings.xml配置文件后期需要修改。 - lib目录 :存放Maven依赖的jar包。Maven也是使用java开发的,所以它也依赖其他的jar包。
- 配置环境变量 MAVEN_HOME 为安装路径的bin目录
此电脑右键 -->高级系统设置-->高级-->环境变量
- 在系统变量处新建一个变量
MAVEN_HOME

- 在
Path中进行配置
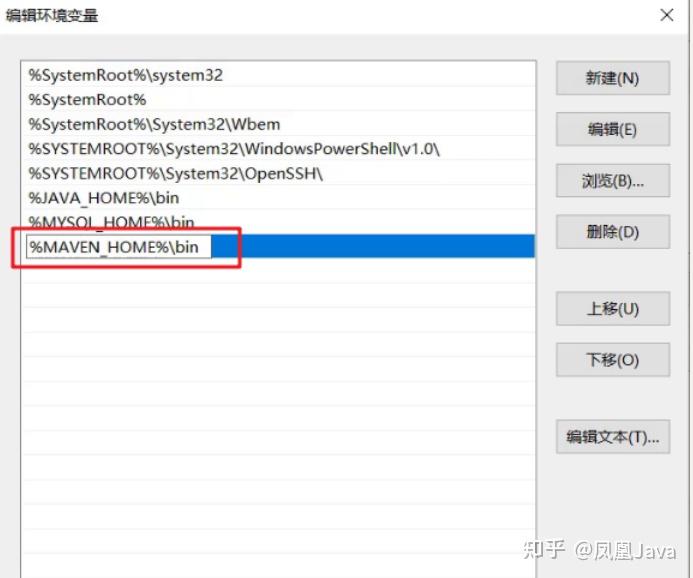
- 打开命令提示符进行验证,出现如图所示表示安装成功

- 配置
本地仓库:
- 修改 conf/settings.xml 中的 为一个指定目录作为本地仓库,用来存储jar包。
- 配置
阿里云私服
- 中央仓库在国外,所以下载jar包速度可能比较慢,而阿里公司提供了一个远程仓库,里面基本也都有开源项目的jar包。修改 conf/settings.xml 中的 标签,为其添加如下子标签:
- 配置
默认1.8jdk
<?xml version="1.0" encoding="UTF-8"?>

<settings xmlns="http://maven.apache.org/SETTINGS/1.0.0"
          xmlns:xsi="http://www.w3.org/2001/XMLSchema-instance"
          xsi:schemaLocation="http://maven.apache.org/SETTINGS/1.0.0 http://maven.apache.org/xsd/settings-1.0.0.xsd">

    <!-- 1. 配置本地仓库目录 -->
    <localRepository>d:/tools/m2/repo</localRepository>

    <pluginGroups></pluginGroups>
    <proxies></proxies>
    <servers></servers>

    <mirrors>
        <!-- 2. 配置阿里云镜像仓库 -->
        <mirror>
            <id>alimaven</id>
            <name>aliyun maven</name>
            <url>http://maven.aliyun.com/nexus/content/groups/public/</url>
            <mirrorOf>central</mirrorOf>
        </mirror>
    </mirrors>

    <profiles>
        <!-- 3. 配置默认jdk1.8 -->
        <profile>
            <id>jdk-1.8</id>
            <activation>
                <activeByDefault>true</activeByDefault>
                <jdk>1.8</jdk>
            </activation>
            <properties>
                <maven.compiler.source>1.8</maven.compiler.source>
                <maven.compiler.target>1.8</maven.compiler.target>
                <maven.compiler.compilerVersion>1.8</maven.compiler.compilerVersion>
                <maven.compiler.encoding>utf-8</maven.compiler.encoding>
                <project.build.sourceEncoding>UTF-8</project.build.sourceEncoding>
            </properties>
        </profile>
    </profiles>

</settings>
1.3 Maven基本使用
1.3.1 Maven 常用命令
- compile :编译
- clean:清理
- test:测试
- package:打包
- install:安装
- 在
资料\maven-project提供了一个使用Maven构建的项目
- 而我们使用上面命令需要在磁盘上进入到项目的
pom.xml目录下,打开命令提示符

- 编译命令演示:
mvn compile
- 执行上述命令可以看到:
- 从阿里云下载编译需要的插件的jar包,在本地仓库也能看到下载好的插件
- 在项目下会生成一个
target目录

- 同时在项目下会出现一个
target目录,编译后的字节码文件就放在该目录下

- 清理命令演示:
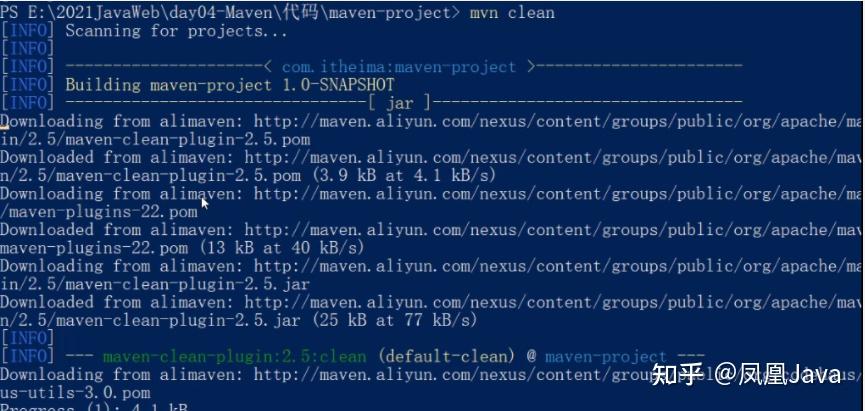
mvn clean
执行上述命令可以看到
- 从阿里云下载清理需要的插件jar包
- 删除项目下的
target目录
- 打包命令演示:
mvn package
- 执行上述命令可以看到:
- 从阿里云下载打包需要的插件jar包
- 在项目的
terget目录下有一个jar包(将当前项目打成的jar包)

- 测试命令演示:
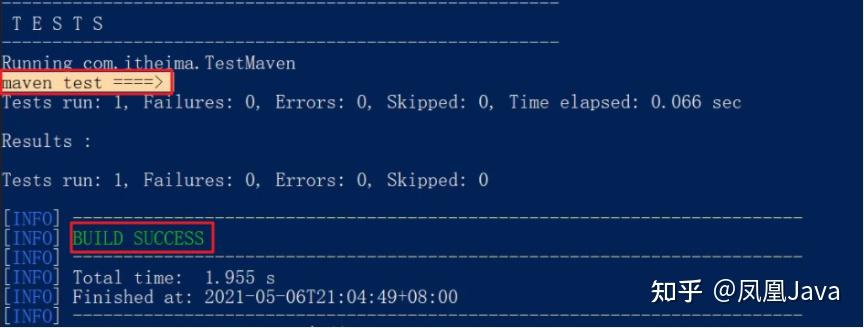
mvn test
- 该命令会执行所有的测试代码。执行上述命令效果如下
- 安装命令演示:
mvn install
- 该命令会将当前项目打成jar包,并安装到本地仓库。执行完上述命令后到本地仓库查看结果如下:

1.3.2 Maven 生命周期
- Maven 构建项目生命周期描述的是一次构建过程经历经历了多少个事件
- Maven 对项目构建的生命周期划分为3套:
- clean :清理工作。
- default :核心工作,例如编译,测试,打包,安装等。
- site : 产生报告,发布站点等。这套声明周期一般不会使用。
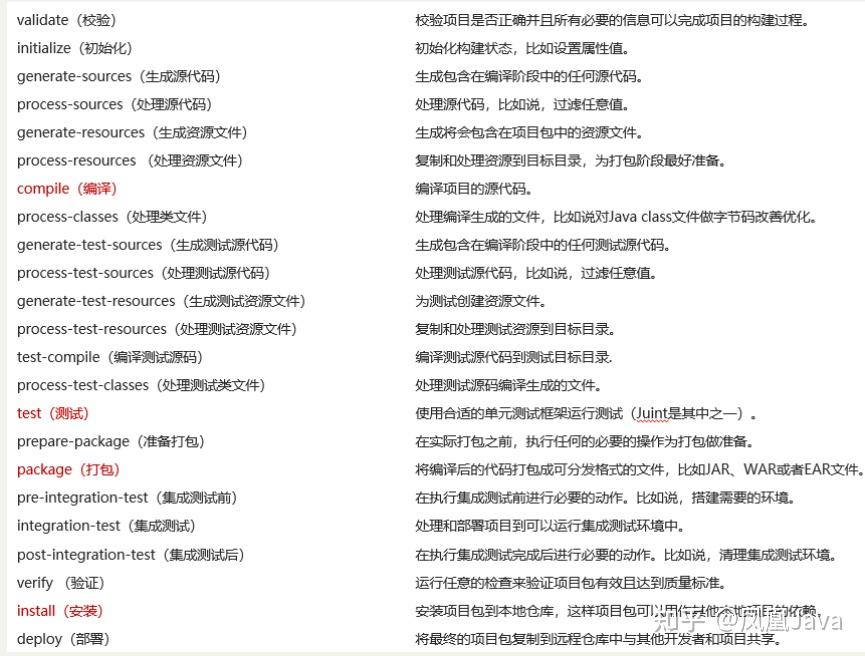
- 同一套生命周期内,执行后边的命令,前面的所有命令会自动执行。例如默认(default)生命周期如下:

- 当我们执行
install(安装)命令时,它会先执行compile命令,再执行test命令,再执行package命令,最后执行install命令。
- 当我们执行
package(打包)命令时,它会先执行compile命令,再执行test命令,最后执行package命令。
- 默认的生命周期也有对应的很多命令,其他的一般都不会使用,我们只关注常用的:
1.4 IDEA使用Maven
- 以后开发中我们肯定会在高级开发工具中使用Maven管理项目,而我们常用的高级开发工具是IDEA,所以接下来我们会讲解Maven在IDEA中的使用。
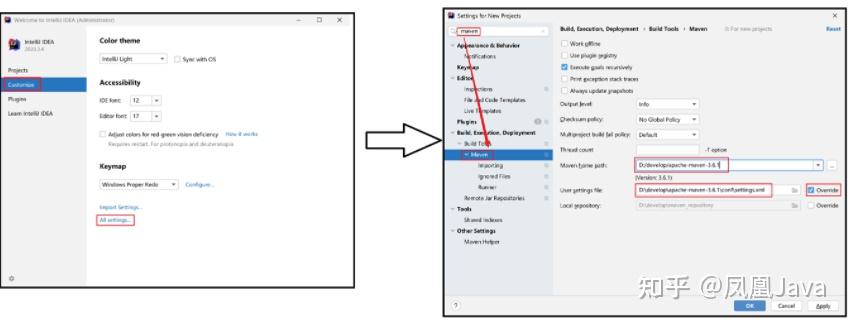
1.4.1 IDEA配置Maven环境
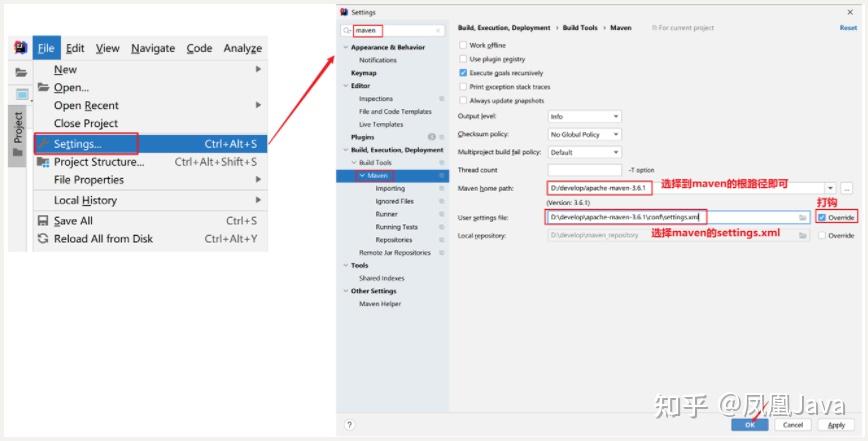
- 【第一遍】我们需要在当前project中配置Maven环境:
- 选择 IDEA中 File --> Settings --> 搜索 maven
- 设置 IDEA 使用本地安装的 Maven,并修改配置文件路径
- 【第二遍】我们需要在全局环境中配置Maven环境
- 选择 IDEA中 File -->Close Project --> Customize --> 搜索 maven
- 设置 IDEA 使用本地安装的 Maven,并修改配置文件路径
1.4.2 Maven 坐标详解
- 什么是坐标?
- Maven 中的坐标是==资源的唯一标识==
- 使用坐标来定义项目或引入项目中需要的依赖
- Maven 坐标主要组成
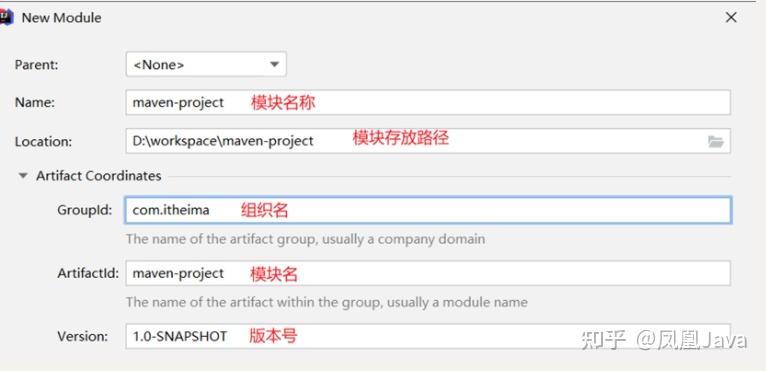
- groupId:定义当前Maven项目隶属组织名称(通常是域名反写,例如:com.itheima)
- artifactId:定义当前Maven项目名称(通常是模块名称,例如 order-service、goods-service)
- version:定义当前项目版本号
- 如下图就是使用坐标表示一个项目:

==注意:==
- 上面所说的资源可以是插件、依赖、当前项目。
- 我们的项目如果被其他的项目依赖时,也是需要坐标来引入的。
1.4.3 IDEA 创建 Maven项目
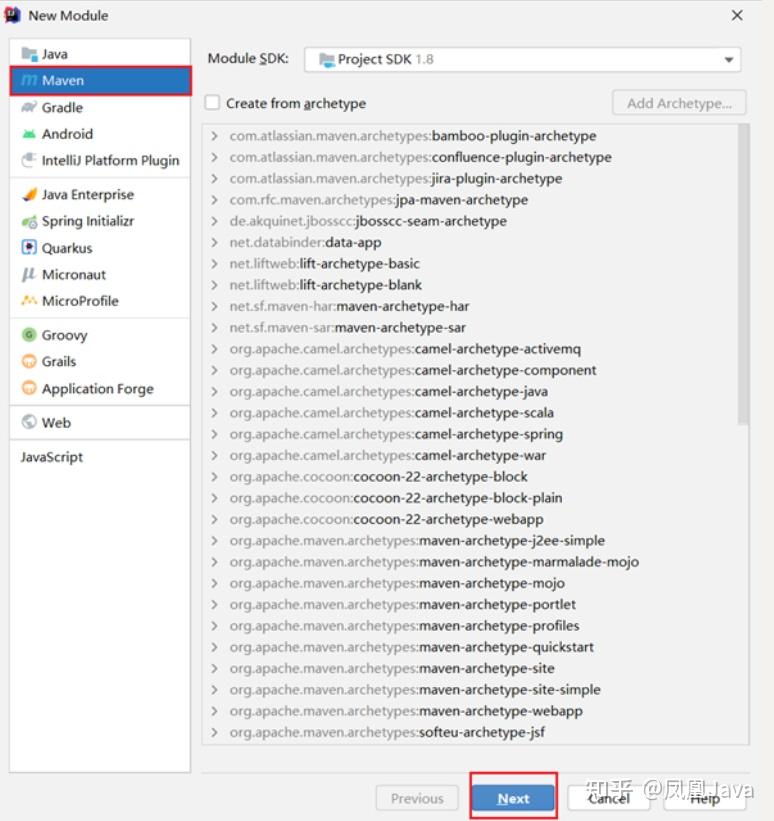
- 创建模块,选择Maven,点击Next
- 填写模块名称,坐标信息,点击finish,创建完成
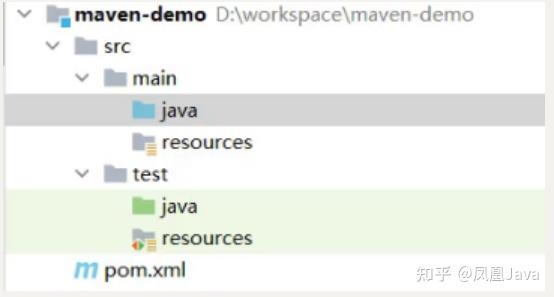
- 创建好的项目目录结构如下:
- 编写 HelloWorld,并运行
==1.4.4 解决不支持的发行版本的错误==
- 现象:maven默认使用jdk1.5 编译项目,版本太低,可能导致以下错误:

- 解决:在maven的settings.xml中配置编译的jdk版本,在标签中配置
<profile>
    <!-- 定义的编译器插件 ID,全局唯一 -->
    <id>jdk-1.8</id>
    <!-- 插件标记,activeByDefault 默认编译器,jdk提供编译器版本 -->
    <activation>
        <activeByDefault>true</activeByDefault>
        <jdk>1.8</jdk>
    </activation>
    <!-- 配置信息 source-源信息,target-字节码信息,compilerVersion-编译过程版本 -->
    <properties>
        <maven.compiler.source>1.8</maven.compiler.source>
        <maven.compiler.target>1.8</maven.compiler.target>
        <maven.compiler.compilerVersion>1.8</maven.compiler.compilerVersion>
        <maven.compiler.encoding>utf-8</maven.compiler.encoding>
        <project.build.sourceEncoding>UTF-8</project.build.sourceEncoding>
    </properties>
</profile>
1.4.5 IDEA 导入 Maven项目
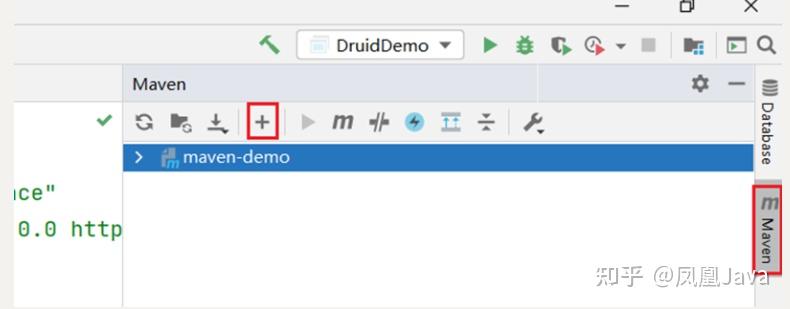
- 大家在学习时可能需要看老师的代码,当然也就需要将老师的代码导入到自己的IDEA中。我们可以通过以下步骤进行项目的导入:
- 选择右侧Maven面板,点击 + 号
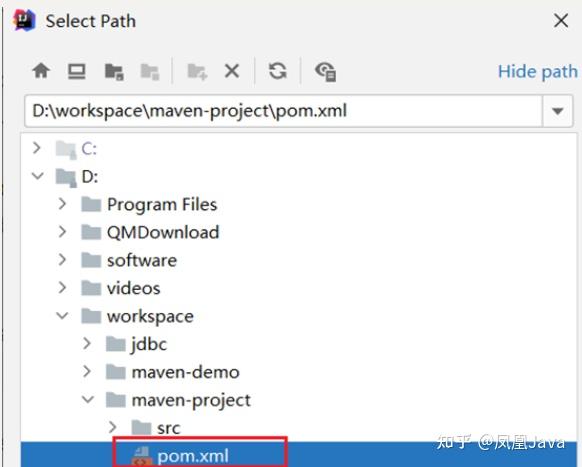
- 选中对应项目的pom.xml文件,双击即可
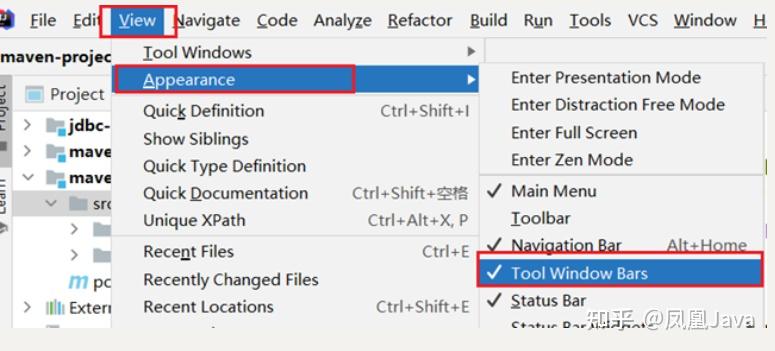
- 如果没有Maven面板,选择
View --> Appearance --> Tool Window Bars
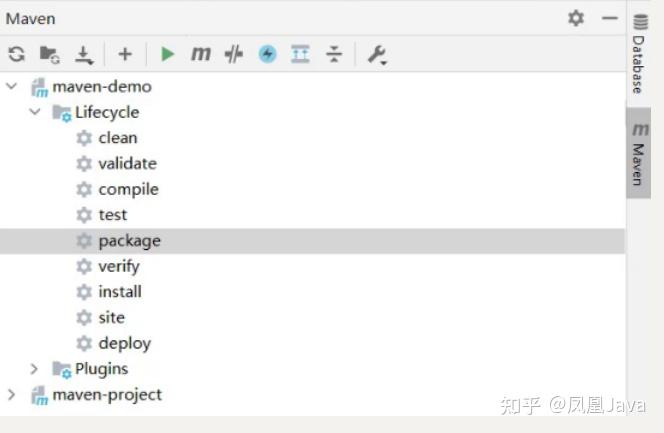
- 可以通过下图所示进行命令的操作:
配置 Maven-Helper 插件
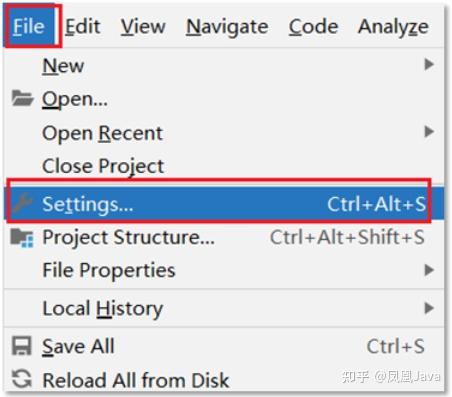
- 选择 IDEA中 File --> Settings
- 选择 Plugins
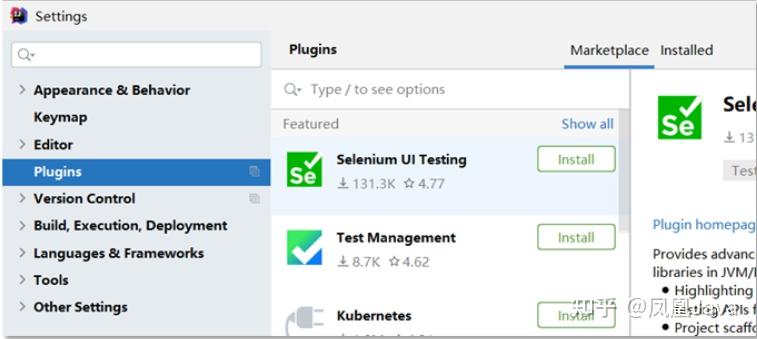
- 搜索 Maven,选择第一个 Maven Helper,点击Install安装,弹出面板中点击Accept

- ==重启 IDEA==
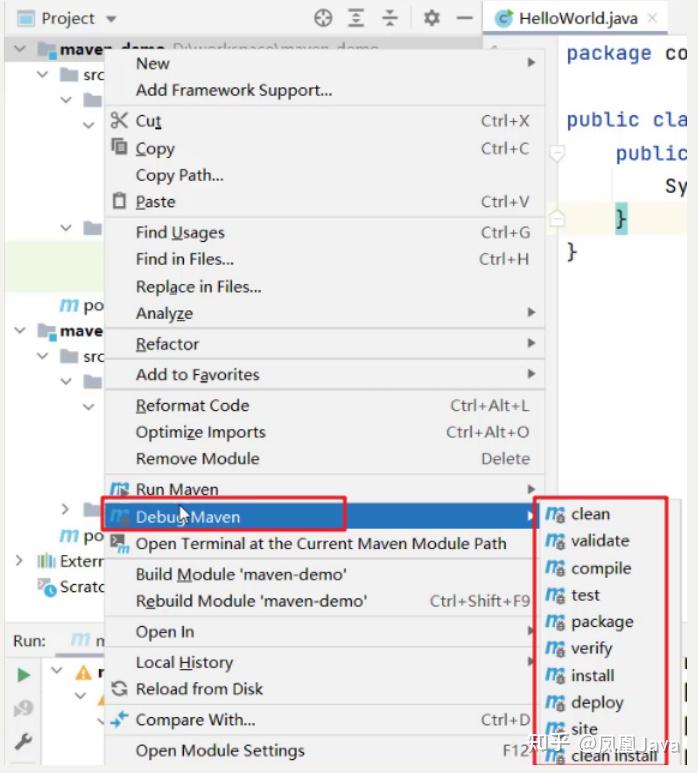
- 安装完该插件后可以通过 选中项目右键进行相关命令操作,如下图所示:
1.5 依赖管理
1.5.1 使用坐标引入jar包
使用坐标引入jar包的步骤:
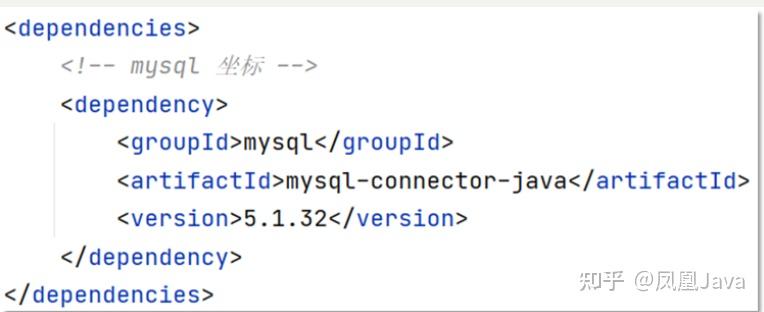
- 在项目的 pom.xml 中编写 标签
- 在 标签中 使用 引入坐标
- 定义坐标的 groupId,artifactId,version
- 点击刷新按钮,使坐标生效
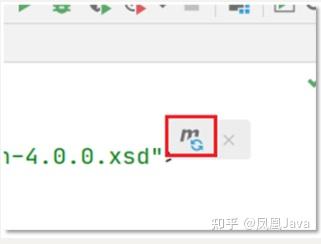
注意:
- 具体的坐标我们可以到如下网站进行搜索
- https://mvnrepository.com/
快捷方式导入jar包的坐标:
- 每次需要引入jar包,都去对应的网站进行搜索是比较麻烦的,接下来给大家介绍一种快捷引入坐标的方式
- 在 pom.xml 中 按 alt + insert,选择 Dependency
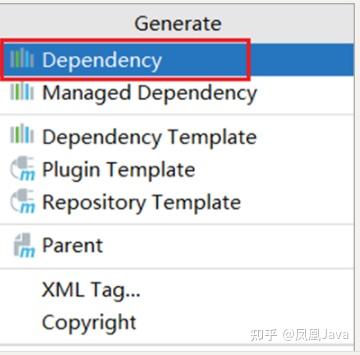
- 在弹出的面板中搜索对应坐标,然后双击选中对应坐标
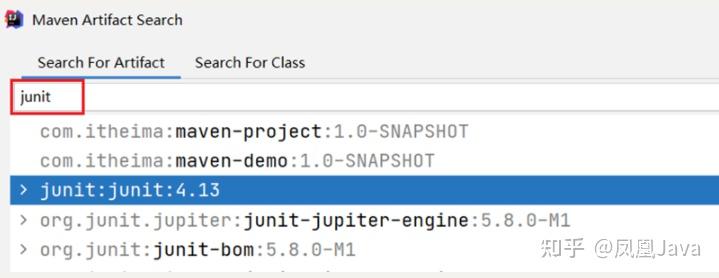
- 点击刷新按钮,使坐标生效
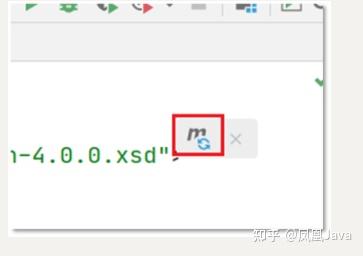
自动导入设置:
- 上面每次操作都需要点击刷新按钮,让引入的坐标生效。当然我们也可以通过设置让其自动完成
- 选择 IDEA中 File --> Settings
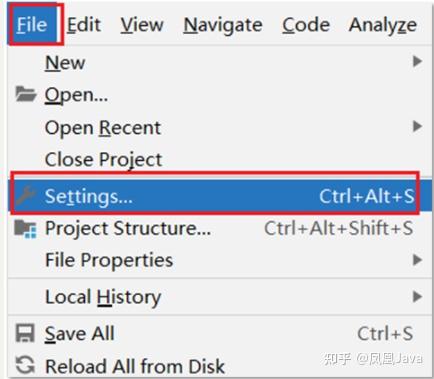
- 在弹出的面板中找到 Build Tools
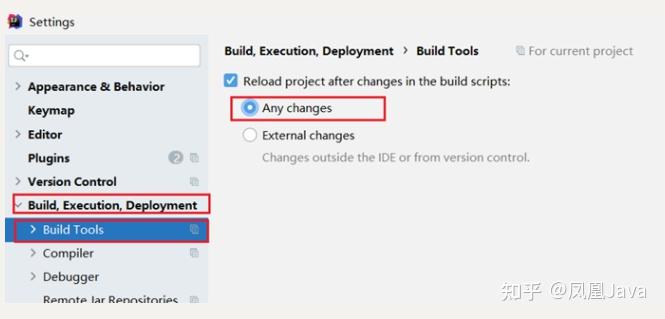
- 选择 Any changes,点击 ok 即可生效
1.5.2 依赖范围
- 通过设置坐标的依赖范围(scope),可以设置 对应jar包的作用范围:编译环境、测试环境、运行环境。
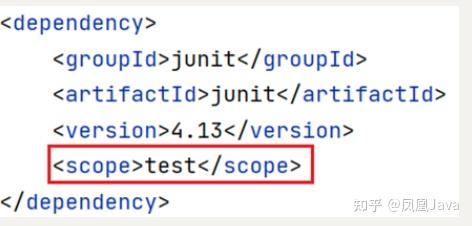
- 如下图所示给
junit依赖通过scope标签指定依赖的作用范围。 那么这个依赖就只能作用在测试环境,其他环境下不能使用。
- 那么
scope都可以有哪些取值呢?
| 依赖范围 | 编译classpath | 测试classpath | 运行classpath | 例子 |
|---|---|---|---|---|
| compile | Y | Y | Y | logback |
| test | - | Y | - | Junit |
| provided | Y | Y | - | servlet-api |
| runtime | - | Y | Y | jdbc驱动 |
| system | Y | Y | - | 存储在本地的jar包 |
- compile :作用于编译环境、测试环境、运行环境。
- test : 作用于测试环境。典型的就是Junit坐标,以后使用Junit时,都会将scope指定为该值
- provided :作用于编译环境、测试环境。我们后面会学习
servlet-api,在使用它时,必须将scope设置为该值,不然运行时就会报错 - runtime : 作用于测试环境、运行环境。jdbc驱动一般将
scope设置为该值,当然不设置也没有任何问题
注意:
- 如果引入坐标不指定
scope标签时,默认就是 compile 值。以后大部分jar包都是使用默认值。
1. Maven 高级
1.1 分模块开发
当项目规模变大,需要将模块按业务,按功能进行拆分,这样的好处是
- 增强代码的复用性:一些通用的工具类、实体类可以抽取到独立的模块,进行重用
- 便于分工:按业务划分模块可以让开发人员编写代码更为独立,互不干扰
- 对 maven 项目来讲,一些通用的依赖、插件,可以抽取到父模块,简化配置。通过对这一阶段的学习,发现 Spring Boot 的 pom 配置非常简洁,它就是利用了继承,依赖管理等手段来实现此效果
下面就来学习分模块的步骤
步骤1 - 创建父模块
与创建普通 maven 工程类似,唯一不同的一点是
<?xml version="1.0" encoding="UTF-8"?>
<project xmlns="http://maven.apache.org/POM/4.0.0"
         xmlns:xsi="http://www.w3.org/2001/XMLSchema-instance"
         xsi:schemaLocation="http://maven.apache.org/POM/4.0.0 http://maven.apache.org/xsd/maven-4.0.0.xsd">

    ...

    <packaging>pom</packaging>

    ...

</project>
父模块的作用有两点,后面会展开讲解
- 继承:提供公共的属性、依赖、和插件,供子模块使用
- 聚合:可以统一驱动子模块,例如统一 test、package、install 等
步骤2 - 创建子模块
如下图所示,目录关系上【父模块】包含【子模块】
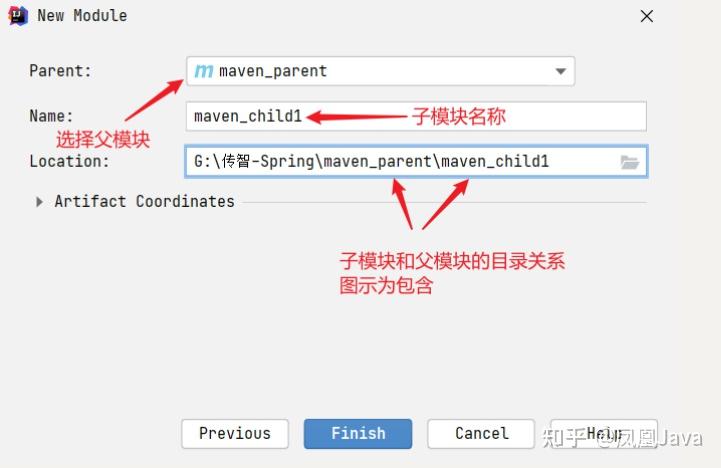
如下图所示,目录关系上【父模块】与【子模块】平级,都位于 G:\传智-Spring 目录下
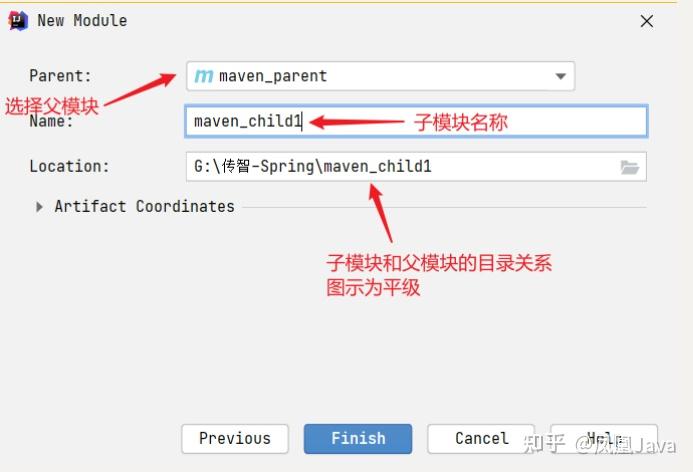
两种都行,选择一种喜欢的即可
试着创建两个子模块,maven_child1 与 maven_child2,观察 pom 文件,有两点变化:
父模块的 pom.xml
<?xml version="1.0" encoding="UTF-8"?>
<project xmlns="http://maven.apache.org/POM/4.0.0"
         xmlns:xsi="http://www.w3.org/2001/XMLSchema-instance"
         xsi:schemaLocation="http://maven.apache.org/POM/4.0.0 http://maven.apache.org/xsd/maven-4.0.0.xsd">

    ...

    <modules>
        <module>maven_child1</module>
        <module>maven_child2</module>
    </modules>

    ...

</project>
<modules> 意思是父模块【聚合】了两个子模块,如果父模块执行一些 maven 命令,例如
- 父模块 compile - 所有被聚合模块都会执行 compile
- 父模块 test - 所有被聚合模块都会执行 test
- 父模块 package - 所有被聚合模块都会执行 package
- 父模块 install - 所有被聚合模块都会执行 install
试着给两个子模块各自添加一个 Service 类,然后执行父模块的 package 命令观察结果
子模块的 pom.xml,以 maven_child1 为例
<?xml version="1.0" encoding="UTF-8"?>
<project xmlns="http://maven.apache.org/POM/4.0.0"
         xmlns:xsi="http://www.w3.org/2001/XMLSchema-instance"
         xsi:schemaLocation="http://maven.apache.org/POM/4.0.0 http://maven.apache.org/xsd/maven-4.0.0.xsd">

    <parent>
        <artifactId>maven_parent</artifactId>
        <groupId>org.example</groupId>
        <version>1.0-SNAPSHOT</version>
    </parent>

    ...

</project>
<parent> 意思是标注继承自哪个模块,继承可以重用父模块的属性、依赖、和插件,下一节展开讲解
步骤3 - 模块间依赖
子模块之间也可以相互依赖,经常把一些公共的功能集中在一个模块里,例如:maven_common 的 pom.xml 文件如下
<?xml version="1.0" encoding="UTF-8"?>
<project xmlns="http://maven.apache.org/POM/4.0.0"
         xmlns:xsi="http://www.w3.org/2001/XMLSchema-instance"
         xsi:schemaLocation="http://maven.apache.org/POM/4.0.0 http://maven.apache.org/xsd/maven-4.0.0.xsd">
    <parent>
        <artifactId>maven_parent</artifactId>
        <groupId>org.example</groupId>
        <version>1.0-SNAPSHOT</version>
    </parent>
    <modelVersion>4.0.0</modelVersion>

    <artifactId>maven_common</artifactId>

</project>
其它模块可以依赖之,与平时依赖第三方 jar 类似
...
<dependency>
    <groupId>org.example</groupId>
    <artifactId>maven_common</artifactId>
    <version>1.0-SNAPSHOT</version>
</dependency>
1.2 继承与依赖管理
1) 继承属性
例如:父模块中指明了模块所用 java 的源码和 class 版本,子模块就无需再次声明
<?xml version="1.0" encoding="UTF-8"?>
<project xmlns="http://maven.apache.org/POM/4.0.0"
         xmlns:xsi="http://www.w3.org/2001/XMLSchema-instance"
         xsi:schemaLocation="http://maven.apache.org/POM/4.0.0 http://maven.apache.org/xsd/maven-4.0.0.xsd">

    ...

    <properties>
        <maven.compiler.source>8</maven.compiler.source>
        <maven.compiler.target>8</maven.compiler.target>
    </properties>

    ...

</project>
2) 自定义属性
如果 pom.xml 文件中像版本号这样的东西重复很多,可以用自定义属性来配置
<dependency>
    <groupId>org.springframework</groupId>
    <artifactId>spring-context</artifactId>
    <version>5.2.9.RELEASE</version>
</dependency>
<dependency>
    <groupId>org.springframework</groupId>
    <artifactId>spring-jdbc</artifactId>
    <version>5.2.9.RELEASE</version>
</dependency>
可以变成
<properties>
    ...
    <spring.version>5.2.9.RELEASE</spring.version>
</properties>
<dependencies>
    <dependency>
        <groupId>org.springframework</groupId>
        <artifactId>spring-context</artifactId>
        <version>${spring.version}</version>
    </dependency>
    <dependency>
        <groupId>org.springframework</groupId>
        <artifactId>spring-jdbc</artifactId>
        <version>${spring.version}</version>
    </dependency>
</dependencies>
3) 强制继承依赖
子模块可以继承父模块 <dependencies> 内的 GAV(GroupId,ArtifactId,Version)信息
例如,父模块
<?xml version="1.0" encoding="UTF-8"?>
<project xmlns="http://maven.apache.org/POM/4.0.0"
         xmlns:xsi="http://www.w3.org/2001/XMLSchema-instance"
         xsi:schemaLocation="http://maven.apache.org/POM/4.0.0 http://maven.apache.org/xsd/maven-4.0.0.xsd">

    ...

    <dependencies>
        <dependency>
            <groupId>junit</groupId>
            <artifactId>junit</artifactId>
            <version>4.13</version>
            <scope>test</scope>
        </dependency>
    </dependencies>

    ...

</project>
两个子模块的 dependencies
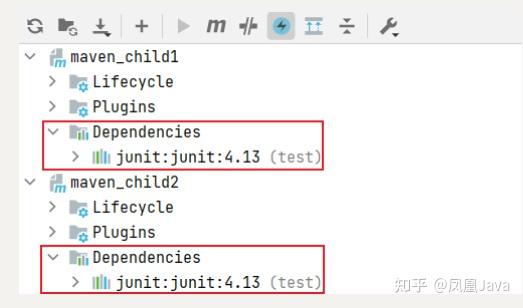
强制继承存在的问题是:有的时候我们不希望把父模块中所有依赖都继承过去,例如,父模块声明了一个 javax.servlet-api,但子模块根本不是 web 项目,这种情况下强制继承就太粗暴了
4) 继承依赖管理
为了解决上述问题,使用依赖继承管理:即父模块中使用 <dependencyManagement> 来声明依赖,子模块通过 <dependency> 选择自己实际需要的坐标,只需声明 GroupId 与 ArtifactId,而依赖的版本由父模块统一控制
例1 - 依赖管理
<?xml version="1.0" encoding="UTF-8"?>
<project xmlns="http://maven.apache.org/POM/4.0.0"
         xmlns:xsi="http://www.w3.org/2001/XMLSchema-instance"
         xsi:schemaLocation="http://maven.apache.org/POM/4.0.0 http://maven.apache.org/xsd/maven-4.0.0.xsd">

    ...

    <dependencyManagement>
        <dependencies>
            <dependency>
                <groupId>javax.servlet</groupId>
                <artifactId>javax.servlet-api</artifactId>
                <version>3.1.0</version>
                <scope>provided</scope>
            </dependency>
        </dependencies>
    </dependencyManagement>

    ...

</project>
这时候子模块并没有直接将依赖继承过来,而是需要自己声明【我需要】哪个依赖,例:
maven_child1 模块只需要 javax.servlet-api 依赖,则在自己的 pom.xml 中配置
<?xml version="1.0" encoding="UTF-8"?>
<project xmlns="http://maven.apache.org/POM/4.0.0"
         xmlns:xsi="http://www.w3.org/2001/XMLSchema-instance"
         xsi:schemaLocation="http://maven.apache.org/POM/4.0.0 http://maven.apache.org/xsd/maven-4.0.0.xsd">

    ...

    <artifactId>maven_child1</artifactId>

    <dependencies>
        <dependency>
            <groupId>javax.servlet</groupId>
            <artifactId>javax.servlet-api</artifactId>
        </dependency>
    </dependencies>

</project>
注意版本号没有了,看似虽然只简单了一点点,但意义在于版本号由父模块统一控制了!
当然,如果子模块自己指定了 version,还会以自己指定的 version 为准,但这样一来就丧失了统一控制版本的初衷
例2 - 控制间接依赖版本
父模块中配置了一个 dubbo 依赖
<?xml version="1.0" encoding="UTF-8"?>
<project xmlns="http://maven.apache.org/POM/4.0.0"
         xmlns:xsi="http://www.w3.org/2001/XMLSchema-instance"
         xsi:schemaLocation="http://maven.apache.org/POM/4.0.0 http://maven.apache.org/xsd/maven-4.0.0.xsd">

    ...

    <dependencyManagement>
        <dependencies>
            ...
            <dependency>
                <groupId>org.apache.dubbo</groupId>
                <artifactId>dubbo</artifactId>
                <version>2.7.8</version>
            </dependency>
        </dependencies>
    </dependencyManagement>

    ...

</project>
maven_child2 子模块使用了 dubbo 依赖
<?xml version="1.0" encoding="UTF-8"?>
<project xmlns="http://maven.apache.org/POM/4.0.0"
         xmlns:xsi="http://www.w3.org/2001/XMLSchema-instance"
         xsi:schemaLocation="http://maven.apache.org/POM/4.0.0 http://maven.apache.org/xsd/maven-4.0.0.xsd">

    ...

    <dependencies>
        <dependency>
            <groupId>org.apache.dubbo</groupId>
            <artifactId>dubbo</artifactId>
        </dependency>
    </dependencies>

</project>
通过下图可以看到
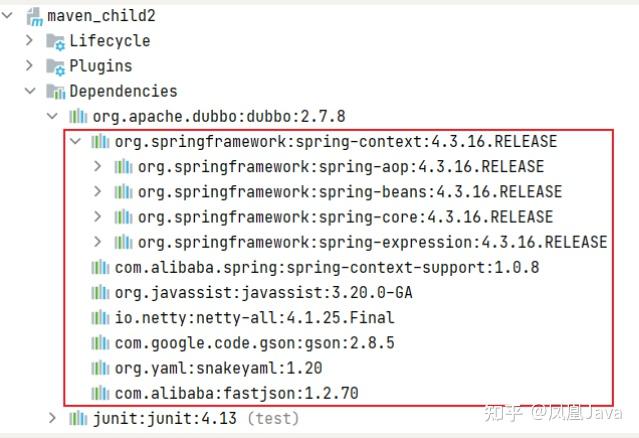
虽然仅是引入了一个 maven 依赖,但 dubbo 本身运行所需的 spring-context 等依赖也被间接加入进来,现在的问题是它间接加入的 spring 相关的 jar 包版本有点低,而我们希望用更高的 spring 的版本怎么办呢?
解决方法是,在父模块中加入 spring-context 的高版本依赖
<?xml version="1.0" encoding="UTF-8"?>
<project xmlns="http://maven.apache.org/POM/4.0.0"
         xmlns:xsi="http://www.w3.org/2001/XMLSchema-instance"
         xsi:schemaLocation="http://maven.apache.org/POM/4.0.0 http://maven.apache.org/xsd/maven-4.0.0.xsd">

    ...

    <dependencyManagement>
        <dependencies>
            ...
            <dependency>
                <groupId>org.apache.dubbo</groupId>
                <artifactId>dubbo</artifactId>
                <version>2.7.8</version>
            </dependency>
            <dependency>
                <groupId>org.springframework</groupId>
                <artifactId>spring-context</artifactId>
                <version>5.2.9.RELEASE</version>
            </dependency>
        </dependencies>
    </dependencyManagement>

    ...

</project>
刷新后,发现子模块间接依赖的 spring-context 的版本受到父模块的控制:
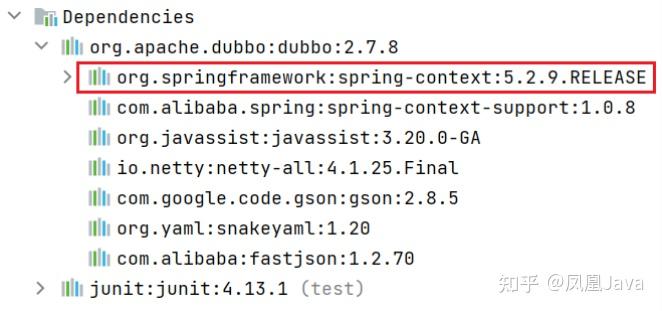
例3 - 排除依赖
父模块中声明了 zookeeper 和 logback 依赖
<?xml version="1.0" encoding="UTF-8"?>
<project xmlns="http://maven.apache.org/POM/4.0.0"
         xmlns:xsi="http://www.w3.org/2001/XMLSchema-instance"
         xsi:schemaLocation="http://maven.apache.org/POM/4.0.0 http://maven.apache.org/xsd/maven-4.0.0.xsd">

    ...

    <dependencyManagement>
        <dependencies>
            ...
            <dependency>
                <groupId>org.apache.zookeeper</groupId>
                <artifactId>zookeeper</artifactId>
                <version>3.6.2</version>
            </dependency>
            <dependency>
                <groupId>ch.qos.logback</groupId>
                <artifactId>logback-classic</artifactId>
                <version>1.2.3</version>
            </dependency>
        </dependencies>
    </dependencyManagement>

    ...

</project>
maven_child2 子模块使用了 zookeeper 和 logback 依赖
<?xml version="1.0" encoding="UTF-8"?>
<project xmlns="http://maven.apache.org/POM/4.0.0"
         xmlns:xsi="http://www.w3.org/2001/XMLSchema-instance"
         xsi:schemaLocation="http://maven.apache.org/POM/4.0.0 http://maven.apache.org/xsd/maven-4.0.0.xsd">

    ...

    <dependencies>
        <dependency>
            <groupId>org.apache.zookeeper</groupId>
            <artifactId>zookeeper</artifactId>
        </dependency>
        <dependency>
            <groupId>ch.qos.logback</groupId>
            <artifactId>logback-classic</artifactId>
        </dependency>
    </dependencies>

</project>
我们的期望是使用 logback 作为日志输出,但 zookeeper 自带了 log4j 日志的依赖,两个日志是有冲突的,如下图所示,此时并不能用就近原则来解决此问题
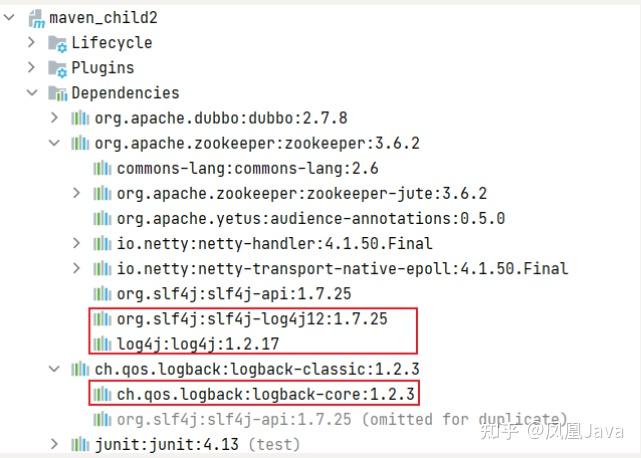
可以使用依赖排除,排除掉不想要的即可
<?xml version="1.0" encoding="UTF-8"?>
<project xmlns="http://maven.apache.org/POM/4.0.0"
         xmlns:xsi="http://www.w3.org/2001/XMLSchema-instance"
         xsi:schemaLocation="http://maven.apache.org/POM/4.0.0 http://maven.apache.org/xsd/maven-4.0.0.xsd">

    ...

    <dependencyManagement>
        <dependencies>
            ...
            <dependency>
                <groupId>org.apache.zookeeper</groupId>
                <artifactId>zookeeper</artifactId>
                <version>3.6.2</version>
                <exclusions>
                    <exclusion>
                        <groupId>org.slf4j</groupId>
                        <artifactId>slf4j-log4j12</artifactId>
                    </exclusion>
                    <exclusion>
                        <groupId>log4j</groupId>
                        <artifactId>log4j</artifactId>
                    </exclusion>
                </exclusions>
            </dependency>
            <dependency>
                <groupId>ch.qos.logback</groupId>
                <artifactId>logback-classic</artifactId>
                <version>1.2.3</version>
            </dependency>
        </dependencies>
    </dependencyManagement>

    ...

</project>
注意
- 以上操作均建议在父模块进行配置,虽然在子模块做也可以,但通用性就差了
- Spring Boot 里经常使用排除依赖配合条件装配的技巧,切换内嵌 web 容器实现、日志实现、数据源实现等等
5) boot 依赖管理
学到现在,回过头来再看看 spring boot 应用的 pom.xml 文件
<project xmlns="http://maven.apache.org/POM/4.0.0" xmlns:xsi="http://www.w3.org/2001/XMLSchema-instance"
         xsi:schemaLocation="http://maven.apache.org/POM/4.0.0 https://maven.apache.org/xsd/maven-4.0.0.xsd">
    <modelVersion>4.0.0</modelVersion>
    <parent>
        <groupId>org.springframework.boot</groupId>
        <artifactId>spring-boot-starter-parent</artifactId>
        <version>2.5.5</version>
        <relativePath/> <!-- lookup parent from repository -->
    </parent>
    <!-- ... -->
    <dependencies>
        <dependency>
            <groupId>org.springframework.boot</groupId>
            <artifactId>spring-boot-starter</artifactId>
        </dependency>

        <dependency>
            <groupId>org.springframework.boot</groupId>
            <artifactId>spring-boot-starter-test</artifactId>
            <scope>test</scope>
        </dependency>
    </dependencies>

    <build>
        <plugins>
            <plugin>
                <groupId>org.springframework.boot</groupId>
                <artifactId>spring-boot-maven-plugin</artifactId>
            </plugin>
        </plugins>
    </build>

</project>
现在大家应该能看懂,它是采用了 maven 继承的思想,继承了 spring-boot-starter-parent 这个依赖,有如下特点
- spring-boot-starter、spring-boot-starter-test 等依赖的版本通过依赖管理的方式来统一管理了版本
- spring-boot-starter 等以 starter 结尾的依赖使用了传递依赖的方式,集成了大量相关的依赖
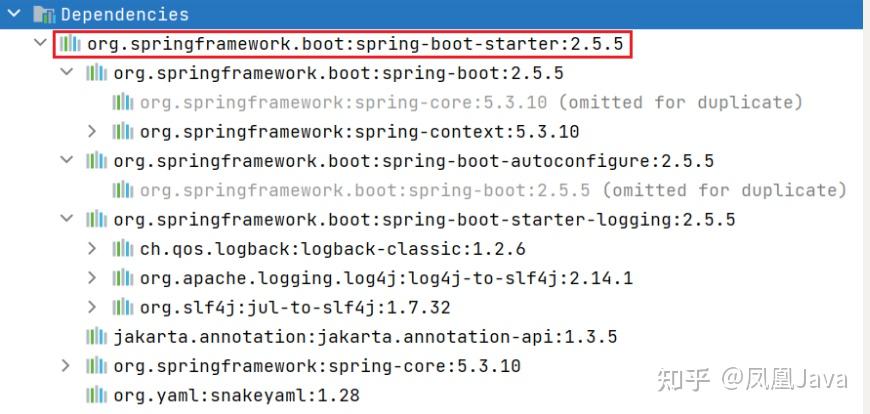
以上的两个做法,都大大简化了依赖管理。
1.3 插件
maven 提供了很多有用的插件,介绍一些较为有用的
1) maven-compiler-plugin
它可以控制项目中
<source>控制 java 源码的版本- 3.8.0 以上版本默认 java 源码版本为 1.6,否则默认 java 版本为 1.5
<target>控制 class 的版本- 3.8.0 以上版本默认 class 版本为 1.6,否则默认 class 版本为 1.5
<encoding>控制源码字符集
<?xml version="1.0" encoding="UTF-8"?>
<project xmlns="http://maven.apache.org/POM/4.0.0"
         xmlns:xsi="http://www.w3.org/2001/XMLSchema-instance"
         xsi:schemaLocation="http://maven.apache.org/POM/4.0.0 http://maven.apache.org/xsd/maven-4.0.0.xsd">

    ...

    <build>
        <plugins>
            <plugin>
                <groupId>org.apache.maven.plugins</groupId>
                <artifactId>maven-compiler-plugin</artifactId>
                <version>3.1</version>
                <configuration>
                    <source>8</source>
                    <target>8</target>
                    <encoding>UTF-8</encoding>
                </configuration>
            </plugin>
        </plugins>
    </build>
</project>
以上配置均有简化形式
<properties>
    <maven.compiler.source>8</maven.compiler.source>
    <maven.compiler.target>8</maven.compiler.target>
    <project.build.sourceEncoding>UTF-8</project.build.sourceEncoding>
</properties>
2) maven-surefire-plugin
它可以控制项目的单元测试
平时我们可以点击 idea 工具条来跳过测试
它的实际原理是在执行 mvn 命令时添加了 -DskipTests=true 这个虚拟机参数
如果需要更详细的控制,见下面的例子
例:跳过所有测试
<?xml version="1.0" encoding="UTF-8"?>
<project xmlns="http://maven.apache.org/POM/4.0.0"
         xmlns:xsi="http://www.w3.org/2001/XMLSchema-instance"
         xsi:schemaLocation="http://maven.apache.org/POM/4.0.0 http://maven.apache.org/xsd/maven-4.0.0.xsd">

    ...

    <build>
        <plugins>
            <plugin>
                <groupId>org.apache.maven.plugins</groupId>
                <artifactId>maven-surefire-plugin</artifactId>
                <version>2.22.2</version>
                <configuration>
                    <skipTests>true</skipTests>
                </configuration>
            </plugin>
        </plugins>
    </build>
</project>
3) maven-resources-plugin
它的主要作用
- 一是将
src/main/resources下的资源(*.xml,*.properties等)拷贝到 classes 目录,以便后续运行时能够找到 - 二是拷贝资源文件时,指定源文件的字符编码
如果不配置,在 maven 构建时,会提示警告错误
[INFO] --- maven-resources-plugin:2.6:resources (default-resources) @ maven_child1 ---
[WARNING] File encoding has not been set, using platform encoding UTF-8, i.e. build is platform dependent!
[WARNING] Using platform encoding (UTF-8 actually) to copy filtered resources, i.e. build is platform dependent!
意思是,源文件的编码没有设置,使用平台编码 utf-8,这个编码是 idea 默认的,如果你在 windows 黑窗口下运行 mvn compile,则提示的警告信息不同
[INFO] --- maven-resources-plugin:2.6:resources (default-resources) @ maven_child1 ---
[WARNING] File encoding has not been set, using platform encoding GBK, i.e. build is platform dependent!
[WARNING] Using platform encoding (GBK actually) to copy filtered resources, i.e. build is platform dependent!
而此时平台编码是 gbk 的
为了避免潜在的问题,建议显式设置此编码,这样警告信息就没有了!
<?xml version="1.0" encoding="UTF-8"?>
<project xmlns="http://maven.apache.org/POM/4.0.0"
         xmlns:xsi="http://www.w3.org/2001/XMLSchema-instance"
         xsi:schemaLocation="http://maven.apache.org/POM/4.0.0 http://maven.apache.org/xsd/maven-4.0.0.xsd">

    ...

    <properties>
        <project.build.sourceEncoding>utf-8</project.build.sourceEncoding>
    </properties>

    ...

</project>
4) spring-boot-maven-plugin
spring-boot-maven-plugin 用来生成可运行的 jar 或 war 包,如果用官网的 Spri